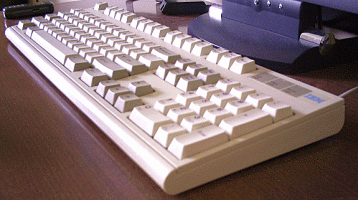
These particular model M buckling spring (B-S) or “clicky” keyboards were paired and sold with IBM PS/1 and some PS/2 systems circa 1990. As of writing, my M2 keyboard is about 18 years old. Old age brings about hardware failures of all sorts and the M2 is no exception. The most common, non-mechanical, failure people have encountered have been dead keyboard controller boards.
When plugged into a PS/2 keyboard port, the M2 shows CapsLock and Scroll Lock lights on but is irresponsive after POST (Power On System Test). A keyboard error message may be displayed and keys will not generate characters with the broken board.
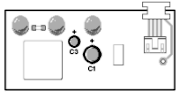
To fix this board you need to open up the M2 and replace 2 capacitors: a small cylindrical component closer to the indicator lights (labelled C3) and one larger, similar component farther away (labelled C1).
These have the following specs: 50V 2.2uF, 16V 47uF, respectively. You can replace them with capacitors that are very roughly within the range of specs. The fault tolerance is huge on these things. Positive leads towards the lights.
Briefing
First, before you disassemble the keyboard, take a photo of the keyboard layout of the keys. You may need this if your keyboard is an international version.
Start by removing all the key caps. Using a flatheaded screwdriver, gently pry each key cap off of its pedestal. Pry white keys first, leaving the gray keys last as they have plastic retainer legs that you need to handle carefully. Once all the key caps are off, take a second photo of where all the springs are located. There will be more holes than B-S parts when you reassemble the keyboard, so this will tell you where they belong. Handle these springs carefully as well. They provide the clicking response when you type, so if they break, you will have a defective keyboard.
Carefully turning the keyboard over, there are 2 square screws. Remove them. Then using a flathead screwdriver, slip the blade into the crevice that separates the top plastic cover from the bottom (where you removed the screws from). Slide the blade along the slit to pop open the latches that hold the keyboard together. This removes the top cover from the bottom cover. At this point the B-S mechanisms will probably all come loose and fall out. Collect them all and keep them together in a container.
Opening the Guts
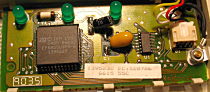
One cover holds the B-S array, the other houses the keyboard membrane and controller. You want to remove the controller from the bottom cover. Remove the two dead capacitors by desoldering them or by brute force. Once clear, solder in your replacements and plug the PS/2 cable to controller back in and test it. Powering on, the lights should all clear and/or NumLock is the only light on after POST. If you’ve placed the controller board back into the cover, tap a few key spots on the membrane. If they register key presses, you’re in business.
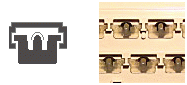
Replace all the B-S mechanisms into their proper holes from the photo. To seat each B-S properly, you need to make sure that the T end of the plastic square fits into the groove so that the spring is near the top of the hole for the key. Failing to do this means that the spring will not function properly and you will have mushy keys.
Making sure all the spring tabs are in place, put the rubber mat on and align the screw holes. Then VERY carefully, snap the back cover of the keyboard on WITHOUT dislodging any of the B-S tabs (the rubber mat will help you do this, if it stays aligned). This step requires a lot of patience. It is critical you get right if you want your keyboard to function well. You will hear several snaps as the back cover latches back onto the front cover. After which, the keyboard should hold itself together as during disassembly. Put the two screws back in and properly re-seat all the key caps so that you have a clicky sound when each key is pressed.
Step 4 : Profit
Congratulations, you have now successfully repaired your IBM M2 keyboard! It will bring you many years of joyful typing and endless productivity.